Fitness fads are some of the funniest blasts from the pasts. Between Suzanne Sommers’ Thigh Master and the never-dying NordicTrack, there are plenty of spoofs to smile about. Though these classics may now only be found collecting dust in your mom’s attic, you’ll still find a few funky-looking fitness tools in today’s modern gyms. We’ve come a long way since leotards and Tony Little, but you have to wonder: Do these really work?
Truthfully, you’d be surprised just how much good these goofy gadgets can do for you. Let’s check out a few of the most common finds, so you know what they are and how to use them for the greatest gains.

Ab roller
The ab roller will help you officially say “adios” to the ab cruncher. If you’ve been hanging on to the awkward contraption that promised a six pack in seconds, you’ve been missing out on a full range of benefits. The ab roller literally offers a greater range of motion, which means you can hit your (hard) core from multiple angles.
How to:
- Kneel down on a flat surface.
- Grip the roller’s handles.
- Pull your belly button in toward your spine.
- Stretch your torso forward without letting your back curve up or down.
- Keeping your core engaged, come back to the start.
Tips:
- If your core is not properly engaged during the full movement, you could hurt your lower back.
- Using your shoulders to pull you in will not do anything for your abs.
- Target your obliques by rolling out and to the sides.
- For a more advanced workout, start with your feet on the floor and your hips in the air. This will look something like a forward fold, but your arms are slightly in front of your feet.
Bosu ball
If you’re not familiar with a Bosu, it’s the stability ball that looks like it was cut in half. You may liken it to wooden balance boards of yesteryear, which were first popular among skiers and surfers. The Bosu, however, is twice as nice. With the flat side down, you can easily stand on the squishy half-ball and practice riding waves. Or, flip it over, and you’ve got a broad-based balance board. See? Two for one!
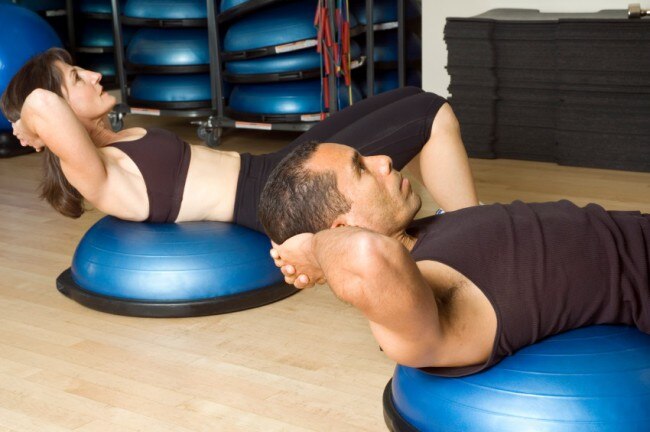
How to:
There are countless exercises you can do with the Bosu ball, from off-balanced push-ups to weighted burpees. Don’t worry – not one muscle group gets left out.
Tips:
- Doing push-ups and burpees, use the handles – they’re there for a reason!
- When performing lateral movements across the Bosu, be sure to point the handles in the 12- and 6-o-clock position to prevent tripping.
- For crunches or sit-ups, position your lower back on the center of the Bosu. Your hips will be on the lower, down-sloping section.
- Keep your Bosu ball pumped well, so it’s about 8 ½ to 10 inches high and firm.
Kettlebells
These triangular, cast-iron weights swung onto the scene early in the 21st century, though they’ve been used religiously in Russia since the 1700s. Case in point: kettlebells have stood the test of time. Because of its odd shape, the kettlebell’s center of gravity shifts as you lift and move it around. This forces you to engage more muscles, as you work to control the unstable weight. Unlike regular dumbbells, the iron bell never lets you isolating just one muscle (or muscle group).
How to: Like the Bosu, there are as many exercises you can do with the kettlebell as you could possibly dream up. But if you’re new to the game, the swing squat is a great place to start.
Swing squat
- Stand, gripping a kettlebell with both hands and arms hanging straight down (but not locked).
- Move feet wider than shoulder-width apart, pushing your hips back and lowering into a traditional squat position (like there’s a chair behind you). The kettlebell should be between your legs and back toward your butt.
- Keep your abdomen strong and steady, so your back doesn’t arch. Then swing the bell up in front of your chest, as you return to the standing position. At the top, tuck in your glutes so your hips push forward. Do as many reps as you can do with good form for 30 seconds.
Tips:
- If you’re comfortable with 10-pound dumbbells, start with a 15-pound kettlebell.
- Wearing thick wristbands can help protect your skin from getting bumped and bruised.
- To keep your spine in alignment, fixate on a focal point about six feet in front of you and down on the ground. This will help your head and neck maintain a neutral position.
Foam rollers
Any runner or endurance athlete with a tight IT band is best friends with their foam roller. Not a runner? Anyone can use this light-weight tool before or after their workouts. Foam rollers are designed to release myofascial tension in almost every major muscle, including hamstrings, glutes, calves, lower back and lats. The best part: you can do this body work on yourself. Though it’s not nearly as relaxing as a massage, it certainly doesn’t cost as much!
How to:
- Position your body on top of the roller, so the insertion point of your target muscle (or tendon) is directly underneath.
- With arms and/or feet planted on the ground, move your body over the foam roller. The roller will remain relatively still. Though it does roll, your body will do most of the moving.
- Keep rolling over the muscle for about 20 to 30 seconds, trying not to roll over any joints.
Tips:
- Adjust the pressure by leaning into the roller more or less.
- Many foam rollers have a flat surface, but grid designs can offer deeper pressure and a greater myofascial release (like a deep tissue massage).
- If you hit a tender spot, stop and hold the pressure on top of it until you feel some relief, or the pain subsides.
Battle ropes
You’d usually only see ropes like these on a ship or maybe on Field Day when you were five years old. No longer reserved for tug-o-war, battle ropes are now a gym staple. Yes, they’re a bit intimidating at first. But, truthfully, anyone – at any level of fitness – can use these bad boys to sculpt serious, gun-show-style arms.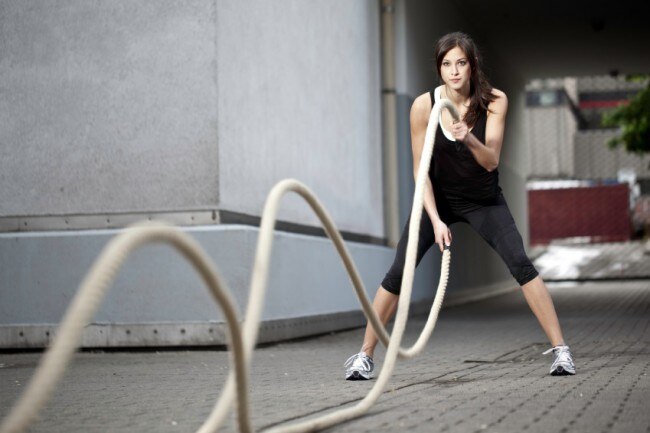
How to:
- Wrap the rope around a secure anchor point.
- Standing about arms’ length behind the rope’s ends, grab one side in each hand.
- With feet firmly planted on the ground at shoulder-width, bend your knees into a squat position.
- Engage your core while you raise and lower each arm with as much force as you can muster. You’ll alternate your arms up and down, so the rope creates a wave-like motion.
- Continue making waves for at least a minute, eventually working up to 20.
Tips:
- Adjust the resistance of the rope by standing closer or farther away. The closer to the anchor point you stand, the harder the resistance and level of intensity.
- For a more intense core workout, or to increase your range of motion, move the ropes side to side or in circles.
- Once you get the hang of the basic wave exercise, try adding a jumping lunge or jump squats to the mix for greater cardiovascular benefits.
Ankle weights
Everyone’s familiar with the bulky, Velcro-strapped fad from the 80s. Luckily, these take-anywhere weights are still around and have evolved to look and feel a lot less, well, bulky. The only issue is you have to know how to use them properly. Back in the day, walking (and even running!) with ankle weights was the “it” thing to do. After a few torn-up knees, strained hips and sprained ankles, people finally realized there’s a time and place to use these weighted flotation devices. But with the right form and function, ankle weights can help strengthen weak spots. For athletes, they’re especially handy in cross-training underused muscles or rehabilitating sport-induced injuries.
How to:
Lying adductor leg lifts
- Strap an ankle weight on your left ankle.
- On the floor (preferably on a mat), lay on your left side with left leg stretched straight out in dorsiflexion (toe pointed back). The right leg should be bent with your right foot flat on the floor, crossed over and in front of your left knee. You can stretch your left arm overhead, or bend your elbow and rest your head in your left hand.
- Keeping left foot flexed, raise your leg about four to six inches off the floor.
- Lower leg to just about an inch above the floor. Repeat for 10 to 12 reps. Switch sides and repeat on right leg.
Weighted triceps dips
- Strap ankles weights on both ankles.
- On an assisted pull-up machine (with the cushion folded down) or stand-alone set of bars, grab the bars and bend your knees to pick your feet up off the floor. If you want, you can cross your ankles.
- Keeping shoulders relaxed (so they aren’t shrugged up to your ears), bend elbows and lower your body until your chest is even with the bars, or as low as you can go without losing form.
- Straighten your arms to push yourself back to starting position.
Tips:
- Use ankle weights for static-active movements or balancing exercises only. This rules out any cardio activities.
- Start with a light weight – 2 or 3 pounds is enough resistance.
- Don’t limit them to your ankles. These pouches can lay flat on your upper leg for added resistance to the clamshell abductor, glute kickbacks and other floor-based exercises.