Yoga blocks may conjure thoughts of novices fresh to the practice, but that’s hardly the case: Whether they’re cork or foam, bamboo or birch, yoga blocks are a terrific tool to help you enhance your poses. From Trikonasana (Triangle Pose) to Virasana (Hero’s Pose), yoga blocks aid with improving the integrity of an asana—or functional posture—while also encouraging more profoundly felt sensations. Intrigued? Read on.
Who should use yoga blocks?
Yoga blocks are a boon for beginners and experts alike, as both can benefit from a block’s ability to “raise the floor”—particularly in poses that require tremendous balance and flexibility.
They’re also an excellent “assist” for those who, no matter how many years they’ve been on the mat, want to reach the full extent of a pose but are anatomically challenged. (Keep in mind that all bodies are different.)
What forms of yoga call for blocks?
Every type of asana—from vinyasa to ashtanga—utilizes, and profits from, yoga blocks.
That said, they’re a key component especially in Iyengar. Developed in the 1940s by B.S. Iyengar, this subset of Hatha Yoga emphasizes alignment, frequently with the inclusion of props—including blocks.
The use of blocks in Iyengar not only helps students slide into and maintain a posture but also draws attention to the precision of how the bones and joints are stacked. In doing so, you can be mindful of your muscles and gentle on your joints—two central pieces to an injury-free, lifelong yoga practice.
Yoga blocks are also a staple in Yin and Restorative Yoga, two forms of yoga that pay particular attention to deep relaxation and replenishment. (What’s the difference between the two? Yin Yoga concentrates on easing and stretching the body’s deep connective tissues, such as the fascia, tendons and ligaments, while Restorative Yoga uses a variety of props, like blankets, foam rollers, and, yes, yoga blocks, to support the body in passive stretches designed to release tension and promote healing.) In both forms, yoga blocks can be used in seated positions to support your pelvic region and take stress off your hips, knees, and lower back—parts of the body that may ache more as you age.
What are the benefits of yoga blocks in my practice?
Yoga blocks don’t just help you nail a pose: They also foster physical—and palpable—change that can be seen, and felt, over time. These include:
Deeper—but safe—stretches
Yoga blocks facilitate more intense stretches. A forward fold, for example, may be difficult for those who have tight hamstrings. With a block, one can “bring” the ground closer to them and move more deeply into the backs of their thighs without strain.
Furthermore, seated postures accompanied by yoga blocks bolsters extension that can deepen your dimensions in other poses, as well as increase your overall range of motion.
Stronger alignment
Without proper instruction—and, occasionally, without a prop like a block—poses can lose their structure: For instance, when learning Utthita Trikonasana (Extended Triangle Pose), a block helps you safely achieve ideal alignment and to lift up out of the pose instead of sinking down. Yoga blocks, in general, nurture appropriate positioning and target the engagement of specific muscles.
Better balance
Using a yoga block for any one of yoga’s many balancing poses adds greater stability to the posture—and once you have stability, you can turn your attention to fine-tuning the integrity of the posture.
Greater elongation
Yoga blocks extend your body—literally. With a hand on a block, you can straighten your limbs longer and reach your fingertips higher. All the while, you’ll be lengthening and strengthening your spine.
Lessens the risk of overstretching
It may be simple for some to ease into seated postures like Supta Baddha Konasana, or Reclined Bound Cobbler Pose—which we’ll get to shortly—in which you lie back in a supine position with the soles of your feet together. And yet, maintaining this posture without the support of blocks can overstretch the muscles in your back, hips and inner thighs, thereby putting you at risk of an injury like a sprain or strain.
How to use yoga blocks
While yoga blocks can be incorporated into nearly every yoga pose, there are several postures in particular that benefit significantly from the inclusion of blocks:
1. Tadasana (Mountain Pose)
Also known as Samasthiti, Tadasana—a fundamental pose that sets the tone, if you will, for both supine and standing postures—looks deceptively easy.
The full engagement and purpose of this pose, however—to stand “as firm and erect as a mountain,” as Iyengar said—requires strength, stability, and focus.
While you might look like you’re “just standing there,” the true integrity of the posture requires tightening your kneecaps, lifting your thighs towards your hips, stacking your shoulders over your hips, dropping your shoulders down your back, broadening your collarbones, and raising the crown of your head towards the sky. These minute tweaks make an enormous difference in the solidity of the pose.
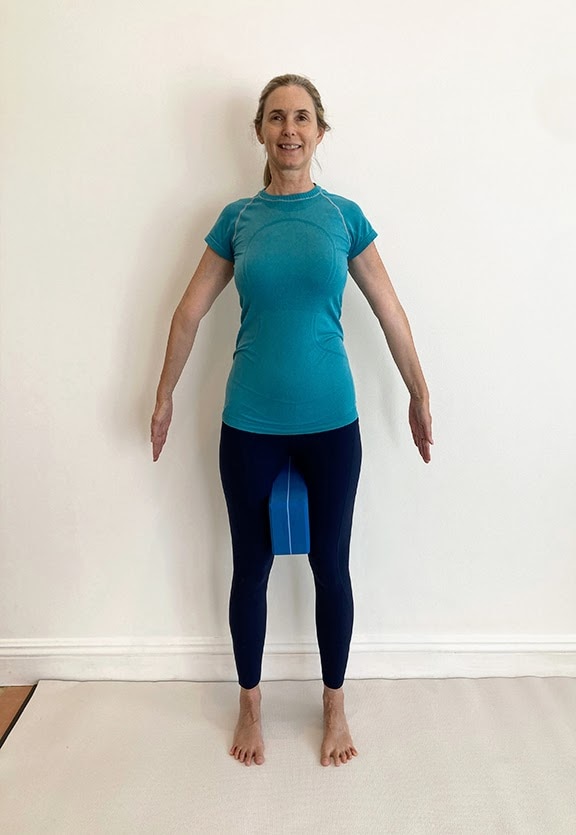
Tadasana with blocks:
- Stand erect with your feet hips-width apart. Feel all four corners of your feet pressing down.
- Place a block between your thighs so that your thighs are pressing inward. Keep your grip on the block throughout this pose.
- Pull your kneecaps up and, using your abdominal muscles, pull your belly button towards your spine.
- Bring your hands by your sides with your palms facing your thighs. Hold—and breathe.
2. Utthita Trikonasana (Extended Triangle Pose)
Triangle Pose holds true to its name: It’s designed to create “triangles” with your body.
In doing so, this traditional posture works your abdominal muscles, operates as a heart opener, and strengthens your legs. All the while, it does wonders in terms of stretching your torso and thighs.
Utthita Trikonasana with blocks:
Blocks can be used at three different heights in this posture (as well as others): Low, middle or high. Play around with each height to determine the best elevation for your body.
- Start in Tadasana with a block in your right hand.
- Step your feet three to four feet apart. Turn your right foot to a 90 degrees angle and place the block at your desired height behind your leg.
- With both legs straight, bend your torso to the right.
- Take your right palm to the block behind your right leg.
- Reach your left arm up towards the ceiling, ensuring that it’s in line with your right shoulder. Elongate your tailbone towards your left heel. Your arms and trunk should be perpendicular to your mat. Again, bring your belly button towards your spine to keep your core engaged.
- Gaze down at your right thumb, up towards your left hand, or keep your head in a neutral position.
- Hold, breathe, and repeat on the left side.
![2 - Trikonasana 1 high height block Triangle Pose]() 3. Uttanasana (Standing Forward Fold)
3. Uttanasana (Standing Forward Fold)
Few things feel as fantastic as stretching your spine. Not only does it clear your mind and create a wonderful sense of expansion in the body, but it also diminishes stress, brightens a dour mood, and stimulates the liver, kidneys, and spleen—organs that are critical to detoxification. In Sanskrit, Uttanasana translates to “deliberate” or “intense” stretch; in practice, it translates to a superb refresh.
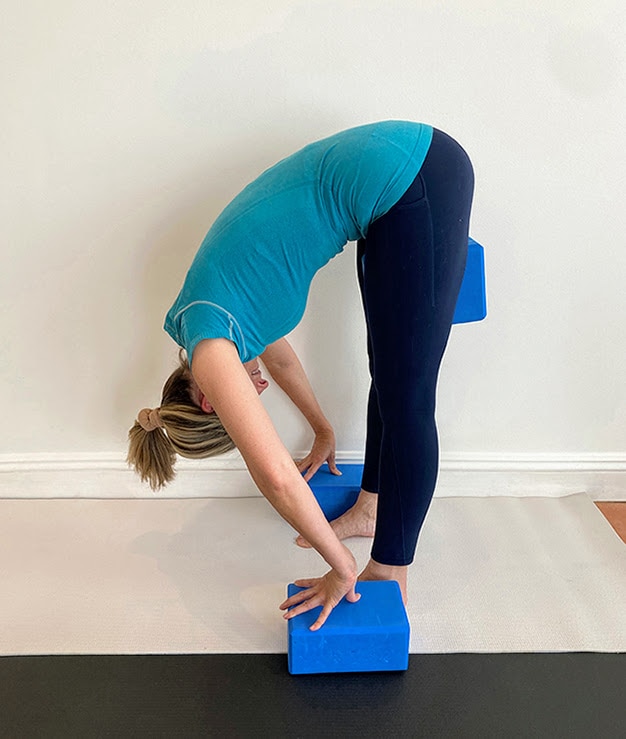
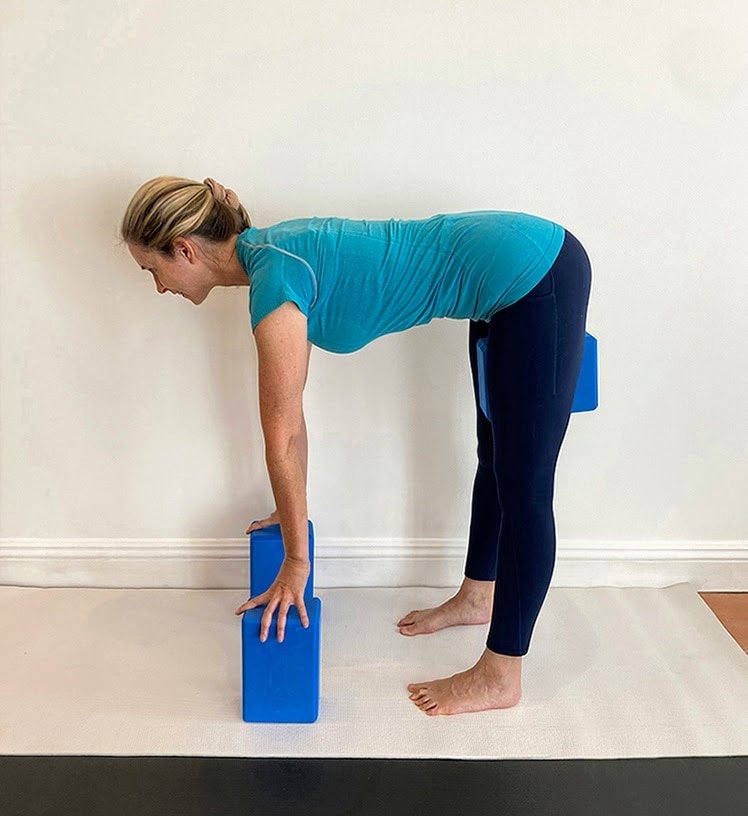
Uttanasana With Blocks:
Variation One (Convex Back)
- For the first variation, start in Mountain Pose with blocks placed outside of your feet. Place another block between your thighs.
- On your exhale, hinge from your hips and place your palms or your fingertips on the blocks. Lengthen your spine, including your cervical spine (or neck), while bringing your chest closer to your knees and your thighs gently pressing back. At the same time, hug your navel towards toward your spine and pull your shoulders towards your hips.
Variation Two (Concave Back)
- Place your blocks approximately one to two feet in front of you. Assume Tadasana again, with one block held firmly between your thighs.
- Bend forward, again from the hips. Place your palms on the blocks in front of you while keeping your spine straight and your toes pointed forward. While extending your sternum forward, pull your scapulae toward your spine, and extend your upper back upwards to create a concavity in your upper thoracic spine. Raise your head slightly and hold, feeling the stretch from your sacrum, through your lumbar spine, and up to your neck and shoulders.
![3 - Uttanasana convex back Uttanasana Convex Back]() 4. Matsyasana (Fish Pose)
4. Matsyasana (Fish Pose)
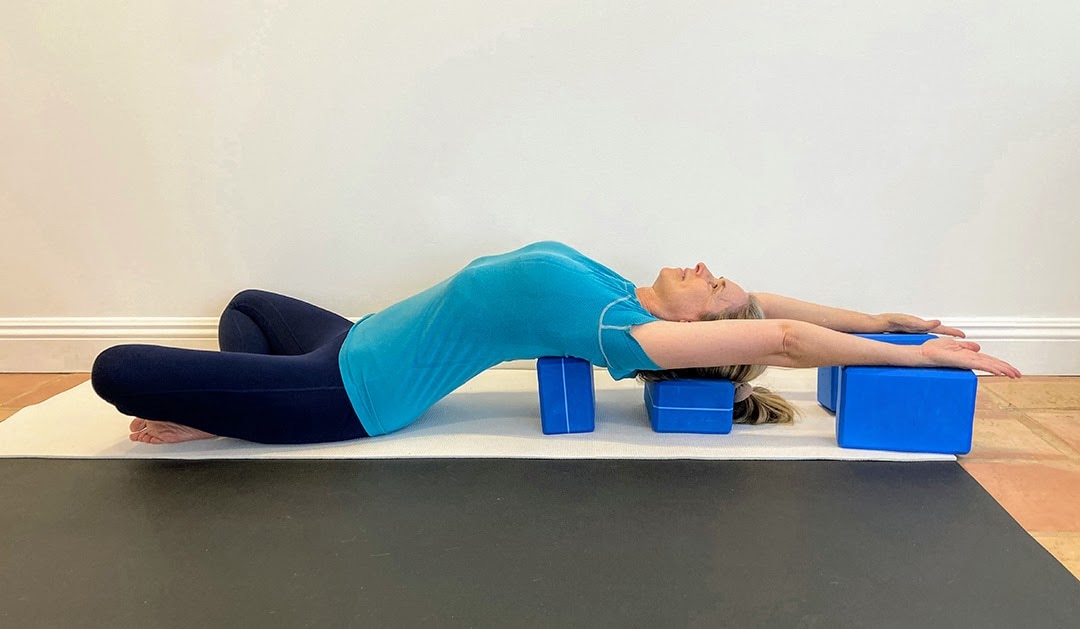
Taken from a timeworn myth of Visnu as a fish, this classic pose empowers those muscles you can’t quite see—your back, cervical spine, and shoulders—while simultaneously providing a delicious stretch for your chest. Known to organically reduce anxiety and mitigate insomnia, it’s an ideal way to conclude a yoga session.
Matsyana with blocks:
- Start in a supine position. Place one block at middle height below your upper ribs—or at the lower border of your scapula—and a block, at its lowest level, underneath the back of your head. Place two additional blocks, lengthwise, and at medium height, roughly a foot away from your head.
- Fold your legs into a cross-legged position. Rest back upon the blocks with your arms straightened above you and your palms up to the ceiling. You should feel a stretch in your upper ribs and an expansion in your chest. Remain in this posture for several breaths.
5. Parighasana (Gate Pose)
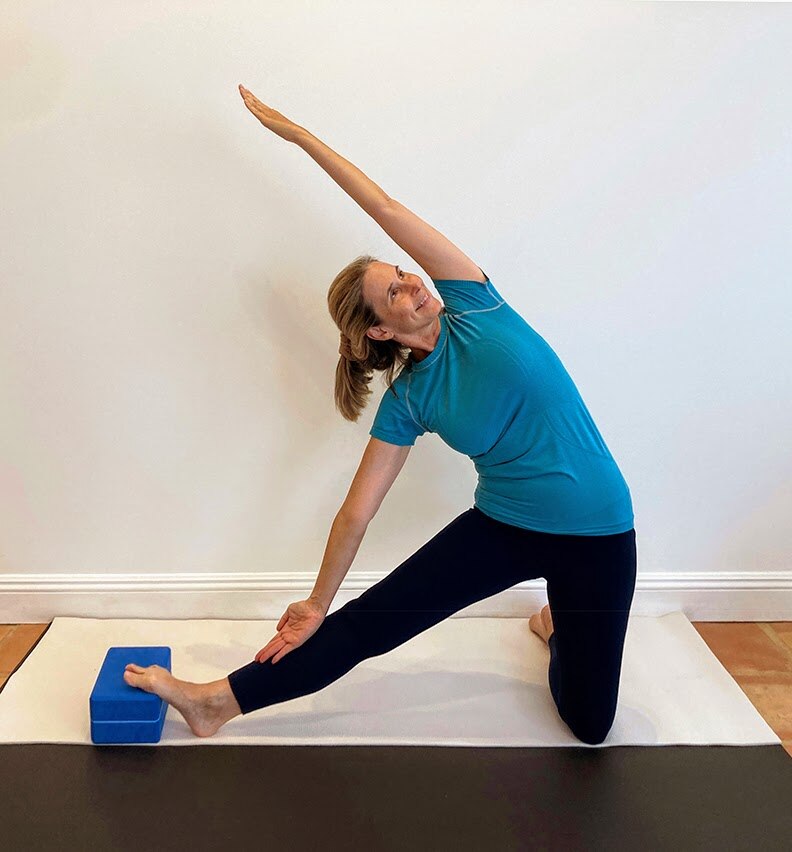
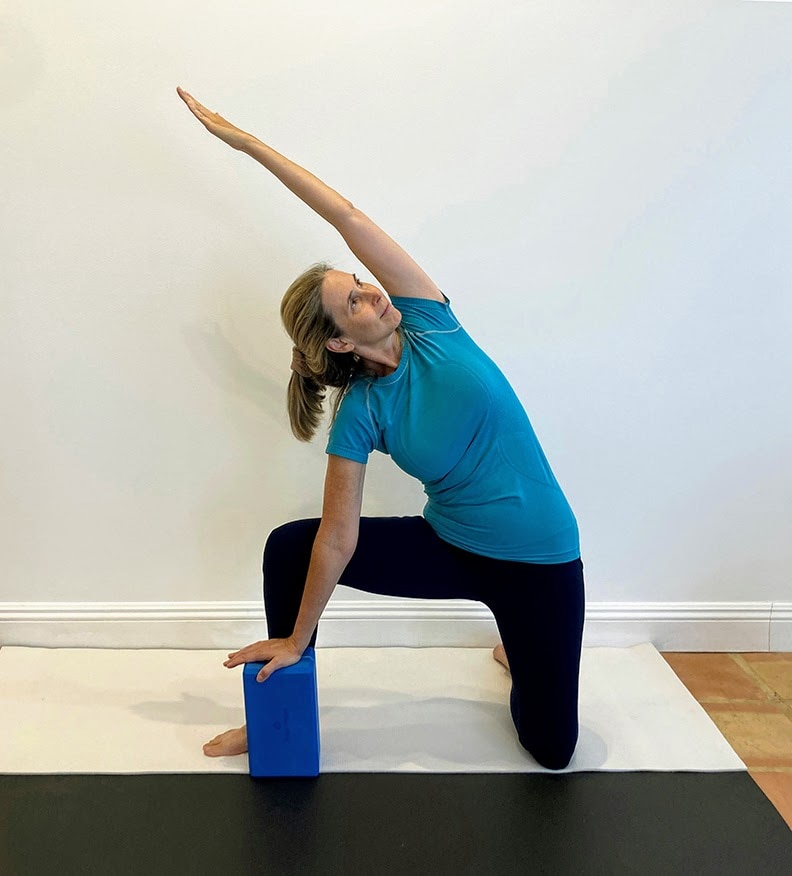
Keen on testing your balance—but in a gentle, freeing way? Weave Parighasana—or Gate Pose—into your practice. With its concentration on stability and stretching the intercostals—muscles that web between your ribs and comprise your chest wall—Parighasana is, in fact, the perfect “gateway” to more advanced balancing asanas: It helps release tension in your torso and readies you for more complicated shapes.
Parighasana with blocks:
Variation One
- Begin with your knees on your mat. (If your knees are sensitive, feel free to place a towel or yoga blanket underneath your knees.)
- Place a single block, on the lowest level, three to four feet away from your right hip.
- Straighten your spine and lift your hands towards the ceiling. Extend your right foot out and align the ball of your foot against the edge of the block.
- On your exhale, bend towards the right, letting your hand slide down your leg to your shin. Keep your left arm extended overhead. With your chest rotated open, bring your gaze underneath your extended arm. Hold for several breaths, release, and repeat on the other side.
- Start in a similar position but keep your right leg bent at a right angle in line with your left knee.
- Bring your block to its highest level and place it in front of your right calve.
- With your left arm extended straight towards the sky, keeping your left hip pinned in, bend towards your right. Gaze underneath your left arm. Hold, release, and repeat on the opposite side.
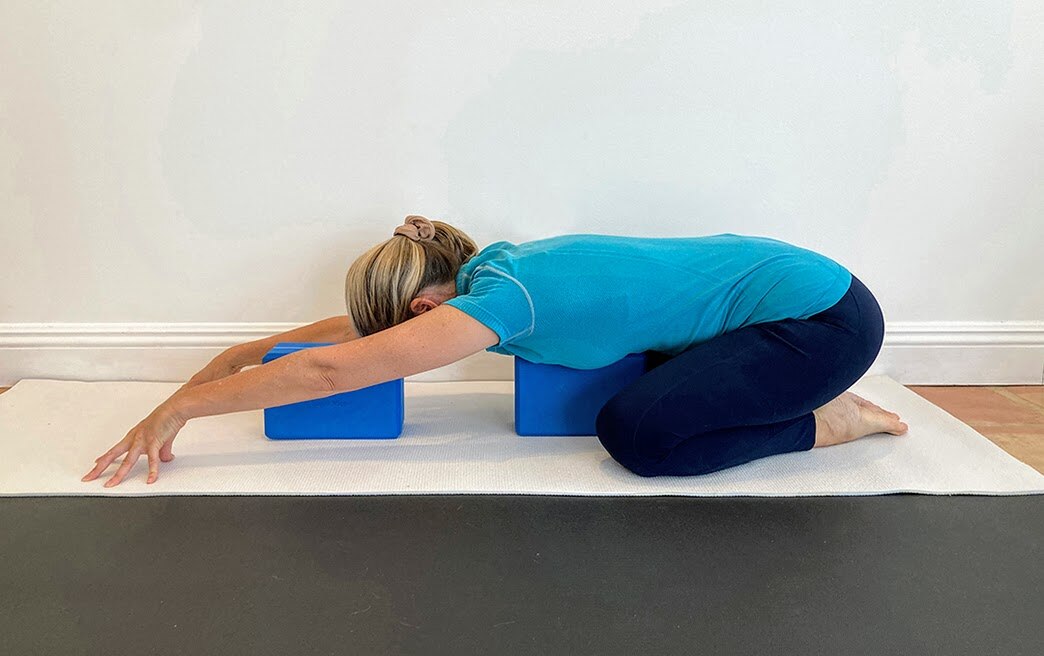
6. Adho Mukha Virasana (Downward Facing Hero Pose)
Feeling fatigued? Situate yourself in Adho Mukha Virasana.
While often confused with Balasana—or Child’s Pose—Downward Facing Hero Pose varies from the traditional posture in that it asks practitioners to lengthen their arms towards the front of their mat rather than extending them towards their heels. In this position, you’ll feel a marvelous stretch between your shoulder blades, at the back of your neck, and in your armpits. The addition of blocks allows you to surrender even more deeply into the posture, which will calm even the busiest of minds.
Adho Mukha Virasana with blocks:
- Start with your knees on your mat. Sit back with your buttocks on your heels and your big toes together, creating enough space between your thighs to easily rest your chest.
- Place one block, at medium height, underneath your chest and another block directly underneath your forehead.
- Reach your hands forward and lift the back of your hands with your fingertips. Breathe into the stretch in your triceps and back. Continue to reach your arms forward and draw your tailbone towards your heels.
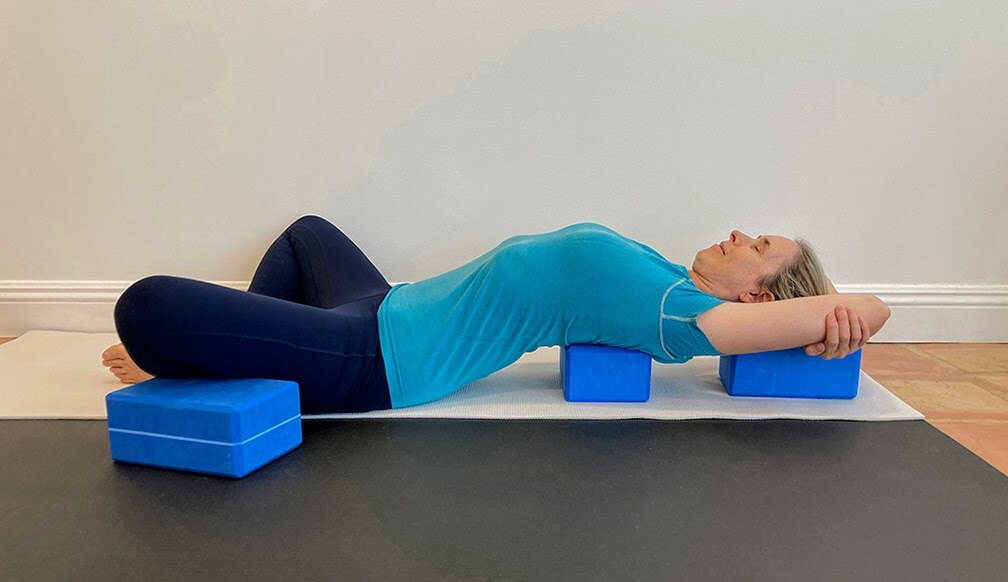
7. Supta Baddha Konasana (Reclining Bound Cobbler Pose)
If you’ve been practicing yoga for some time, you may have heard that your hips hold your emotions, much in the way that your neck and shoulders bear the weight of your stress.
While this may sound a tad “woo-woo” to some, the fact is this: Your flight or fight response, which is engaged during times of stress, activates the kidneys and adrenals. This activation then tightens your psoas—a complex cluster of slow and fast-twitching muscles that connects your torso to your legs. The result? Aching hips—and the subsequent need to stretch them. Supta Baddha Konasana is one way to achieve this—and scrumptiously at that.
Supta Baddha Konasana with blocks:
- Sit on your mat with your spine straight. Bring the soles of your feet together or in a comfortable position with your knees out wide. Place a block, on its lowest level, underneath both of your upper middle thighs.
- Place another block, also at the lowest level, underneath your upper back. Use a third block, at medium height, underneath your head. Recline against the blocks.
- Slightly tuck your chin and bring your arms overhead. Gently cross your arms and cup your elbows, and breathe into the stretch in your hip flexors, inner thighs, chest, lumbar, and thoracic spine.
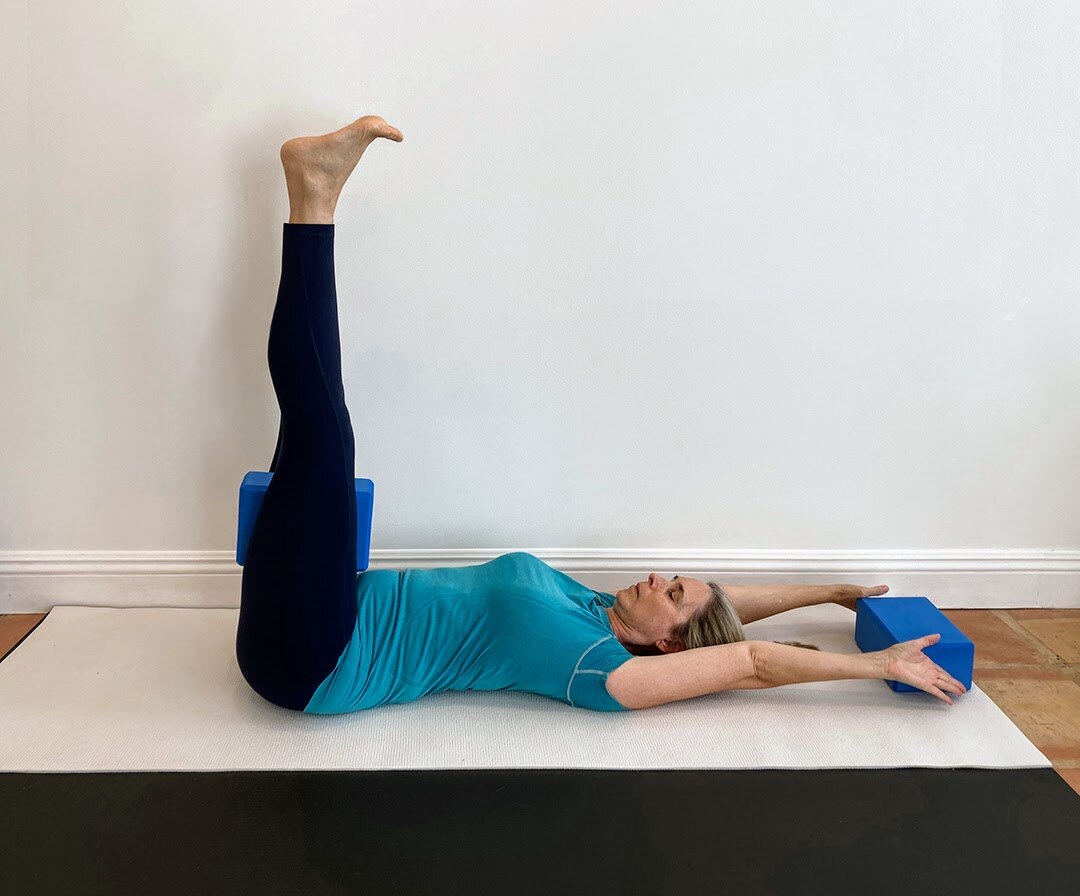
8. Urdhva Prasarita Padasana (Upward Extended Feet Pose)
Consider it Legs-Up-The-Wall (Viparita Karani)—without the wall, and with the support of blocks.
This healing, invigorative pose offers enormous relief to your spine, calves, thighs, hamstrings, feet, and ankles. What’s more, it bolsters blood circulation and alleviates anxiety while also strengthening your hip flexors and core.
Urdhva Prasarita Padasana with blocks
- Lengthen your spine with your back flat against your mat. Place a block between your thighs and extend your legs up towards the ceiling with your feet flexed towards your face. This will help engage your calve muscles and release your hamstrings.
- Place a second block arms-distance away from your head at the back of your mat.
- Extend your arms overhead with your palms facing up, and inner hands pressing into the block.
For another variation, simply remove the block from between your thighs and keep your ankles pressed together overhead.
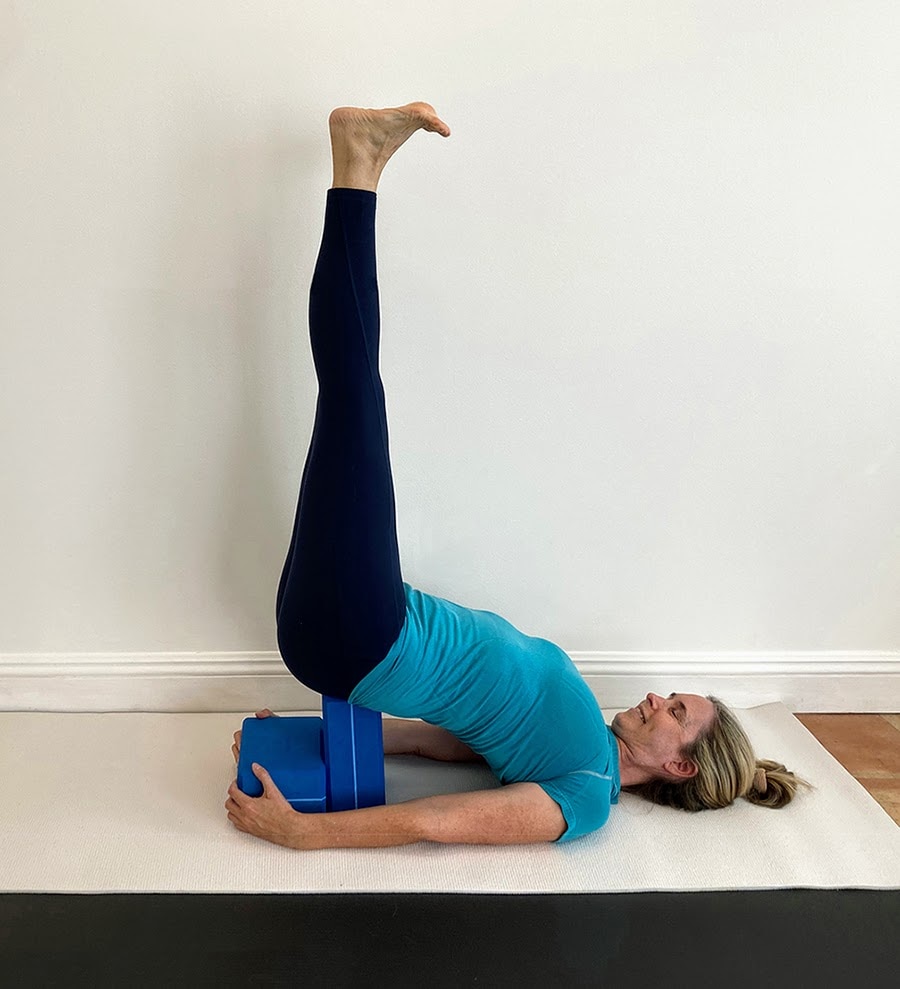
9. Viparita Karani (Legs-Up-The-Wall Pose)
Similar to Upward Extended Feet Pose, Viparita Karani is a godsend for exhausted legs and feet. It, too, enhances circulation and, with its ability to activate the parasympathetic nervous system, soothes the monkey mind. Bonus points? With proper alignment, you won’t need a wall at all.
Viparita Karani with blocks
- Recline on your back with your spine extended long.
- Bring a block, at its lowest height, in front of your hips and clasp your hands around its edges.
- Take a second block, raise your hips, and place it flat against the first block at a height that feels most comfortable to you.
- Roll your shoulders under and press your arms down as you lift your legs towards the ceiling. Lift one leg at a time for stability.
For additional support, place your legs against a wall and relax into the back of your body.
10. Setu Bandha Sarvangasana (Bridge Pose)
While Setu Bandha Sarvangasana may be one of the first backbends taught to new yogis, it’s certainly not a simple pose. Rather, it’s a timeless posture that, over time and with continued adjustments, can grow—proving just how challenging its genuine form can be. With its emphasis on opening the heart space while strengthening the hips and thighs, part of its magic is in the stillness it requires—a precision of focus that ultimately eradicates stress and energizes the mind. Best part yet? It can be performed as either a dynamic movement or a restorative stretch.
Setu Bandha Sarvangasana with blocks:
- Lie on your back with your legs bent and your arms by your side.
- Starting at the base of your spine, gently lift your hips, vertebrae by vertebrae, and place a block at its lowest setting flat on the mat and against your sacrum. Place a second block against the first at either the same setting or medium or high height.
- Cup your hands around the first block for stability and press the back of your arms down to keep your chest lifted. If you can, straighten both legs, one at a time; otherwise, keep your legs in a bent position.
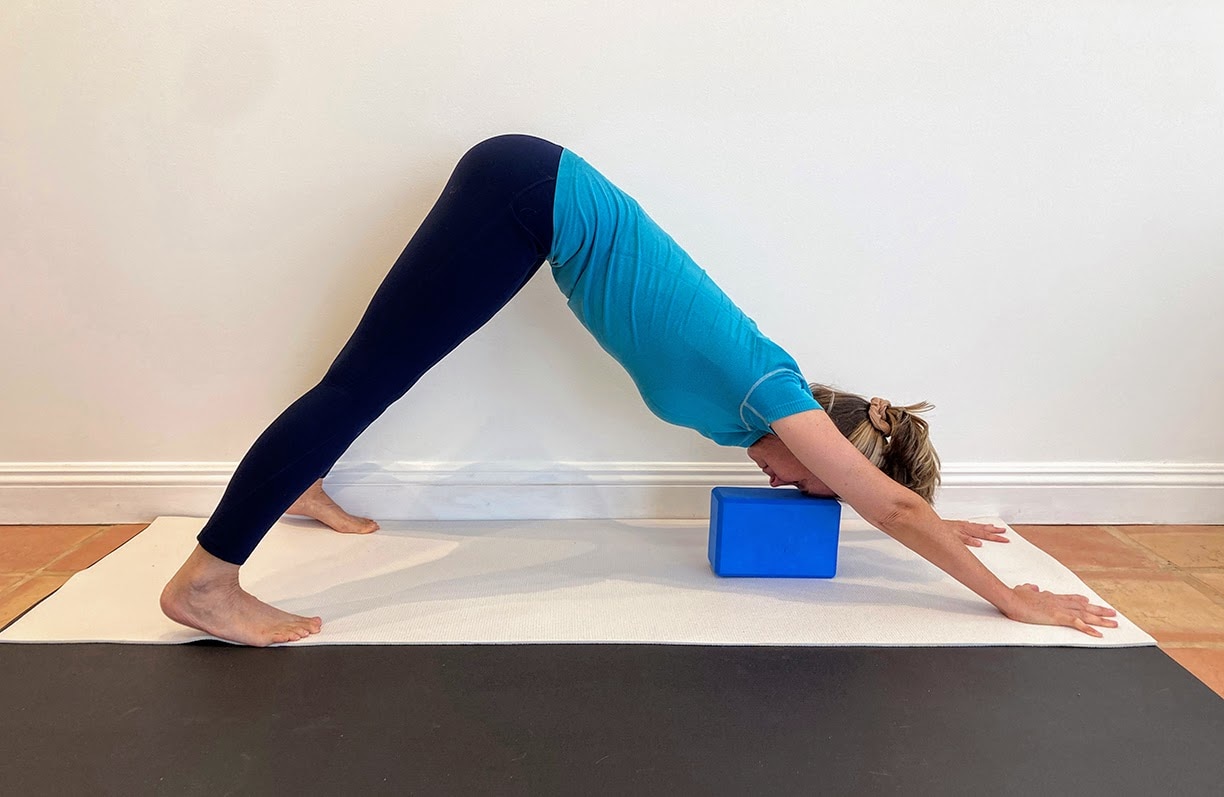
11. Adho Mukha Svanasana (Downward Facing Dog)
Adho Mukha Svanasana may offer a moment of respite in a fast-moving class, but that doesn’t mean there aren’t multiple actions at work in this transformative, quintessential pose. With your hands rooted firmly into your mat, you must also engage your triceps, slide your shoulder blades down your back, release your chest towards your torso, and press down with your heels—seemingly insignificant movements that require intense concentration on almost every part of your body.
And yet, the effort is well worth-it: Downward Facing Dog comes with a host of benefits, from whole body strength to increased flexibility.
Adho Mukha Svanasana with blocks:
- Begin on all fours with your hands directly under your shoulders and a block, placed at medium height, around chest level, on the mat.
- Press your palms firmly into the mat, particularly the curved space between your thumb and forefinger, which will help protect your wrists.
- Straighten your legs, lengthening through your spine and hips. Press your thighbones back into your hamstrings.
- Gently rest your hairline against the block. Alternatively, you can allow the top of your head to be supported by the block.
- Press your heels towards the ground.
- Draw your navel towards your spine, and feel the stretch in the back of your legs, down through your torso, and into your fingertips. Breathe—and relish it all.
Interested in yoga blocks? Gaiam’s Cork Block is a sure-fire way to fall in love with props. Created with all-natural ingredients (read: eco-friendly), it offers superior grip and traction—and will help you elevate your practice.

